Epilog Zing Laser Cutter, 50 watt
Cut Bed:
Location: Makerspace
Use Options: Training only
Cost: Free to use, but select materials are available for purchase, or you may provide your own (see Suggested Settings for approved materials list).
The laser cutter uses a laser to cut and engrave all kinds of materials. This page shows how to prepare a file for cutting and engraving and how to use the laser cutter. Complete our online training course to get authorized!
Users may set their own jobs on the laser cutter after completing a training and signing the Laser Cutter Safety Agreement, but must schedule them ahead of time on Atkins Reservations. Any unscheduled jobs may be stopped and removed from the machine if someone else has scheduled that time. If the user does not check in within 15 minutes of the scheduled start time, the scheduled job will be automatically removed from the calendar.
The artboard is the "canvas" that you are working with in Illustrator. It represents the surface of your material in this case. You can change the size and configuration of your artboard when making a new project by changing the indicated settings.

If you find that the laser cutter does not engrave your photo correctly, complete this step to convert it to grayscale:
View the Instructions for vector cutting and raster engraving.
Vector images are images that are created/displayed using paths and math/coordinates. These images can be scaled infinitely while still maintaining crisp edges. Raster images are images that are made up of individual pixels, usually in the thousands. Each pixel is a different color that, when put together, depicts your image. These images are typically .jpg or .png file types.
For the purposes of laser cutting, "vector" refers to a graphic that has these properties and is able to be cut by the laser. You can create vector images directly in Illustrator, or you can find them as downloads online. Typically, you'll want to use an .svg or .eps file. You can also turn some raster images into vector images using Image Tracing.
In this guide, "raster" refers to a raster image that is used for engraving on the surface of your material.
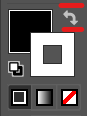
Swap arrow

Correct fill and stroke colors
The outlined square indicates the stroke color, and the filled in square indicates the fill color. The small white square with the red slash through it will change the selected color (whichever box is in front) to transparent. If your graphic is a different color, use the colors window to change the stroke to black. If you can't see the color window, go to Window > Color.
The stroke is the outline of your object. You can typically change the stroke of a selected object in the top bar, but if you don't see that option, navigate to Window > Workspace > Essentials Classic. This will give you easier access to more tools.
The opacity is a number between 0 - 100 that represents how transparent your object is. If you need to check or change the opacity of something, you can find the opacity window by going to Window > Transparency.
Raster images are images that are made up of different colored pixels. They cannot be cut out by the laser cutter, but they can be engraved onto the surface of your material. For example, while darker values in your image often result in darker colors in your project, many kinds of acrylic will appear lighter in areas with heavy engraving. Some materials handle engraving differently, so you may want to test your engraving on a scrap piece of your material before running your project.
If you find that the laser cutter does not engrave your photo correctly, complete this step to convert it to grayscale:
You may want to consider:
You may want to consider:
|
Material |
Action |
DPI/Frequency |
Speed % |
Power % |
|---|---|---|---|---|
|
Acrylic |
Photo Engraving 1/8" (3mm) |
500 DPI |
80 |
15 |
|
Acrylic |
Text/Clipart Engraving |
500 DPI |
75 |
20 |
|
Acrylic* |
Text/Clipart Engraving |
500 DPI |
90 |
30 |
|
Acrylic |
Cutting 1/8" (3mm) |
5000 Frequency |
45 |
80 |
|
Acrylic* |
Cutting 1/4" (6mm) |
5000 Frequency |
25 |
100 |
|
|
Adjusting the standard focus distance so it is closer to the lens by about .030” (.762 mm) will produce better edge quality on 1/4” acrylic and thicker. Two passes may produce better results and allow for cutting through thicker materials. There are two types of acrylic: cast is better for engraving (creates a frosted look when engraved) and extruded acrylics are better for smooth-edged cutting. |
|||
|
Alumamark* |
Engraving |
400 DPI |
90 |
45 |
|
Alumamark* |
Engraving |
500 DPI |
90 |
40 |
|
Andonized Aluminum* |
Photo/Clipart |
400 DPI |
90 |
45 |
|
Andonized Aluminum* |
Photo/Clipart |
500 DPI |
90 |
35 |
|
Andonized Aluminum* |
Text |
500 DPI |
90 |
40 |
|
Cardboard |
1/8" Engraving |
500 DPI |
80 |
12 |
|
Cardboard (See below chart for info on foldable cardboard) |
1/8" Cutting |
500 Frequency |
75 |
20 |
|
Cork* |
Engraving |
400 DPI |
90 |
25 |
|
Cork* |
Cutting |
500 Frequency |
60 |
30 |
|
Cotton* |
Engraving |
250 DPI |
90 |
20 |
|
Denim* (See below chart for more info) |
Engraving |
250 DPI |
90 |
25 |
|
Fleece* |
Engraving |
200 SPI |
90 |
20 |
|
Fleece* |
Cutting |
2500 Frequency |
40 |
10 |
|
Glass* |
Engraving |
400 DPI |
30 |
100 |
|
|
Change the graphic to 80% gray before engraving glass and using the Jarvis dithering pattern. Diffuse heat by covering glass with dish soap. |
|||
|
Leather* |
Photo Engraving |
400 DPI |
90 |
25 |
|
Leather* |
Text/Clipart Engraving |
500 DPI |
90 |
30 |
|
Leather* |
Cutting 1/8" (3mm) |
500 Frequency |
70 |
50 |
|
Mat Board* |
Engraving |
400 DPI |
90 |
50 |
|
Mat Board* |
Cutting |
500 Frequency |
30 |
40 |
|
|
Bottom-up engraving is suggested for mat board etching. |
|||
|
Marble* |
Photo Engraving |
400 DPI |
90 |
45 |
|
Marble* |
Text Engraving |
500 DPI |
90 |
55 |
|
|
Every marble is very different. Start low and increase the power with a second run if you haven’t used that marble before. |
|||
|
Painted Brass* |
Engraving |
400 DPI |
90 |
55 |
|
Painted Brass* |
Engraving |
500 DPI |
90 |
50 |
|
Plastics* |
Engraving |
400 DPI |
90 |
30 |
|
Plastic (2-layer Engravable)* |
Engraving |
400 DPI |
70 |
100 |
|
Plastic (2-layer Engravable)* |
Engraving |
500 DPI |
80 |
100 |
|
Plastic (2-layer Engravable)* |
Cutting 1/8" (3mm) |
5000 Frequency |
80 |
30 |
|
Rubber Stamps* |
Engraving |
400 DPI |
30 |
100 |
|
Rubber Stamps* |
Engraving |
500 DPI |
40 |
100 |
|
Rubber Stamps* |
Cutting |
100 Frequency |
20 |
100 |
|
Stainless Steel w/Cermark* |
Engraving |
500 DPI |
30 |
100 |
|
Twill* |
Cutting |
2500 Frequency |
60 |
20 |
|
Wood* |
Photo Engraving |
500 DPI |
85 |
100 |
|
Wood* |
Clipart/Text Engraving |
400 DPI |
70 |
100 |
|
Wood |
Engraving |
500 DPI |
80 |
12 |
|
Wood* |
Deep Engraving |
500 DPI |
40 |
100 |
|
Wood* |
Thin Veneer |
500 Frequency |
30 |
14 |
| Wood | Cutting 1/16" (1.6mm) | 500 Frequency | 95 | 10 |
|
Wood |
Cutting 1/8" (3mm) |
500 Frequency |
60 |
45 |
|
Wood* |
Cutting 1/4" (6mm) |
500 Frequency |
40 |
100 |
|
Multiple passes may allow cutting of thicker wood. Readjust the focus between passes down to the center point of the cut for best results. |
||||
* These settings are recommended by the manufacturer but have not been tested on our machine. You may need to adjust Speed, Power, Frequency, or DPI for your project. Whenever possible, test setting on a scrap or section of your material that will not be used for your main project.
In Adobe Illustrator, change the stroke value to .001 in or .072 pt for all lines in your design.
In the Laser Dashboard (blue Epilog settings box) use the following settings:
Set to vector mode only. Set Frequency to 500, Power % to 30, and Speed % to 50
Cases when color mapping might be a good idea include:
This laser pointer also serves as a reference for where the laser will fire while the job runs. If you have a project where you want to check exactly where the laser will cut or engrave (i.e. projects where registration is important, projects where you are unsure if you placed your material correctly, etc.) You can run the laser with the pointer turned on and the lid open. The laser will follow the paths that your job has specified, but it won't fire with the lid open, which allows you to preview how your project will be cut.
This laser pointer also serves as a reference for where the laser will fire while the job runs. If you have a project where you want to check exactly where the laser will cut or engrave (i.e. projects where registration is important, projects where you are unsure if you placed your material correctly, etc.) You can run the laser with the pointer turned on and the lid open. The laser will follow the paths that your job has specified, but it won't fire with the lid open, which allows you to preview how your project will be cut.
If the vector grid is not in the laser cutter and aligned with the vent holes, please ask a Makerspace Monitor to insert the grid and check that it is properly lined up.
The vector grid should be as free as possible of small debris before use. Please check for debris inside the vector grid before use. If debris is present, remove the vector grid, turn it upside down over a trash can to dump out debris, and ask a Makerspace Monitor for assistance with replacing and aligning the grid into the machine.
Follow all other instructions for the laser cutter as normal including settings for the vector and raster.

Some laser jobs might benefit from color mapping. Color mapping is the process of assigning different laser settings to different objects in your file and setting them to run in a specific order. This can be beneficial in several situations:
To do this, look at the top of the screen at the tab that lists your file’s name. In parenthesis you will see the document’s colormode.
Setting the G slider at 255 and the other two at 0 will give you green lines, and setting the B slider at 255 and the other two at 0 will give you blue lines. The objects you keep black will be cut last.
It is possible to use other colors than red, green, blue, and black, but it is very unlikely that you will have to use more than that.
If your color changes show up as the fill, click the arrow next to the color boxes on the left of the screen. This will swap the fill color and stroke color.
Note: The frequency slider does not let you type in your desired number, so you will need to manually select it by using the slider.
The software will not save your settings if you do not click the plus sign.